Sauna Ventilation Requirements: How to Vent a Home Sauna Properly
Home sauna ventilation requirements, from intake and exhaust placement to natural and mechanical airflow and the installation details that affect comfort and performance.
Sauna Ventilation Requirements: The Short Answer
Adding a sauna to your home involves more than choosing a heater, finding enough space, and supplying the required electrical power. The sauna also needs a way to bring in fresh air, move that air through the room, and remove stale, moist air after it has done its job.
That makes ventilation part of the sauna installation itself, not an optional detail to address after the walls, benches, and heater are already in place.
In a properly planned home sauna, fresh air enters through a supply or intake opening, mixes with the heated air around the sauna heater, moves through the occupied part of the room, and eventually leaves through an exhaust opening. The exact location of those openings, however, is not universal.
A sauna using natural or gravity ventilation may require a different vent arrangement from one using mechanical exhaust. Heater type, room layout, sensor location, sauna size, and the manufacturer’s installation instructions can all affect where the supply and exhaust should be positioned.
For that reason, the most useful rule is simple: design the ventilation system around the sauna and heater you are actually installing rather than copying a generic vent layout.
For most home sauna projects, the ventilation plan needs to answer five questions:
- Where will fresh air enter the sauna?
- Where will used air leave the room?
- Will airflow be natural or mechanically assisted?
- How will the sauna dry after each session?
- Does the heater or sauna manufacturer specify a particular ventilation layout?
These decisions affect more than fresh air. Vent placement can influence how heat moves through the room, how comfortable the upper bench feels, how quickly moisture clears after use, and, in some installations, how the heater and its temperature sensors operate.
Ventilation should therefore be planned alongside the other installation requirements. If you are still working through the electrical side of the project, our Electrical Requirements for a Home Sauna guide explains the differences between plug in, dedicated circuit, and hardwired sauna installations.
Why Does a Sauna Need Ventilation?
Ventilation gives fresh air a controlled route into the sauna, helps that air move through the occupied part of the room, and provides a path for used and humid air to leave.
A sauna is a small, enclosed room designed to operate at temperatures far above those of the surrounding home. Once the heater is running and people are using the room, heat, moisture, and exhaled air all accumulate inside a relatively small volume of space.
A properly planned ventilation system serves several purposes at the same time:
- Fresh air for bathers. Replacement air helps keep the occupied part of the sauna from feeling stale or stuffy, particularly when several people are using the room.
- Heat distribution through the sauna. Air movement helps incoming air mix with the heated air around the sauna heater and supports a more comfortable temperature pattern through the bathing zone.
- Moisture removal and drying. Ventilation helps move humid air out of the room and supports drying of benches, walls, floors, and other surfaces after use.
- Heater and sensor operation. Airflow near the heater and temperature sensor can affect how some sauna systems regulate heat, which is one reason vent placement should follow the instructions for the exact heater.
More airflow is not automatically better. Excessive or poorly directed airflow can remove heat too quickly or disturb the temperature pattern the sauna is intended to maintain. The goal is controlled air exchange that supports fresh air, heat movement, and drying without undermining the sauna environment.
The next step is to understand the airflow path itself, because intake and exhaust placement only make sense when you know how air should travel through the room.
How Air Should Move Through a Sauna
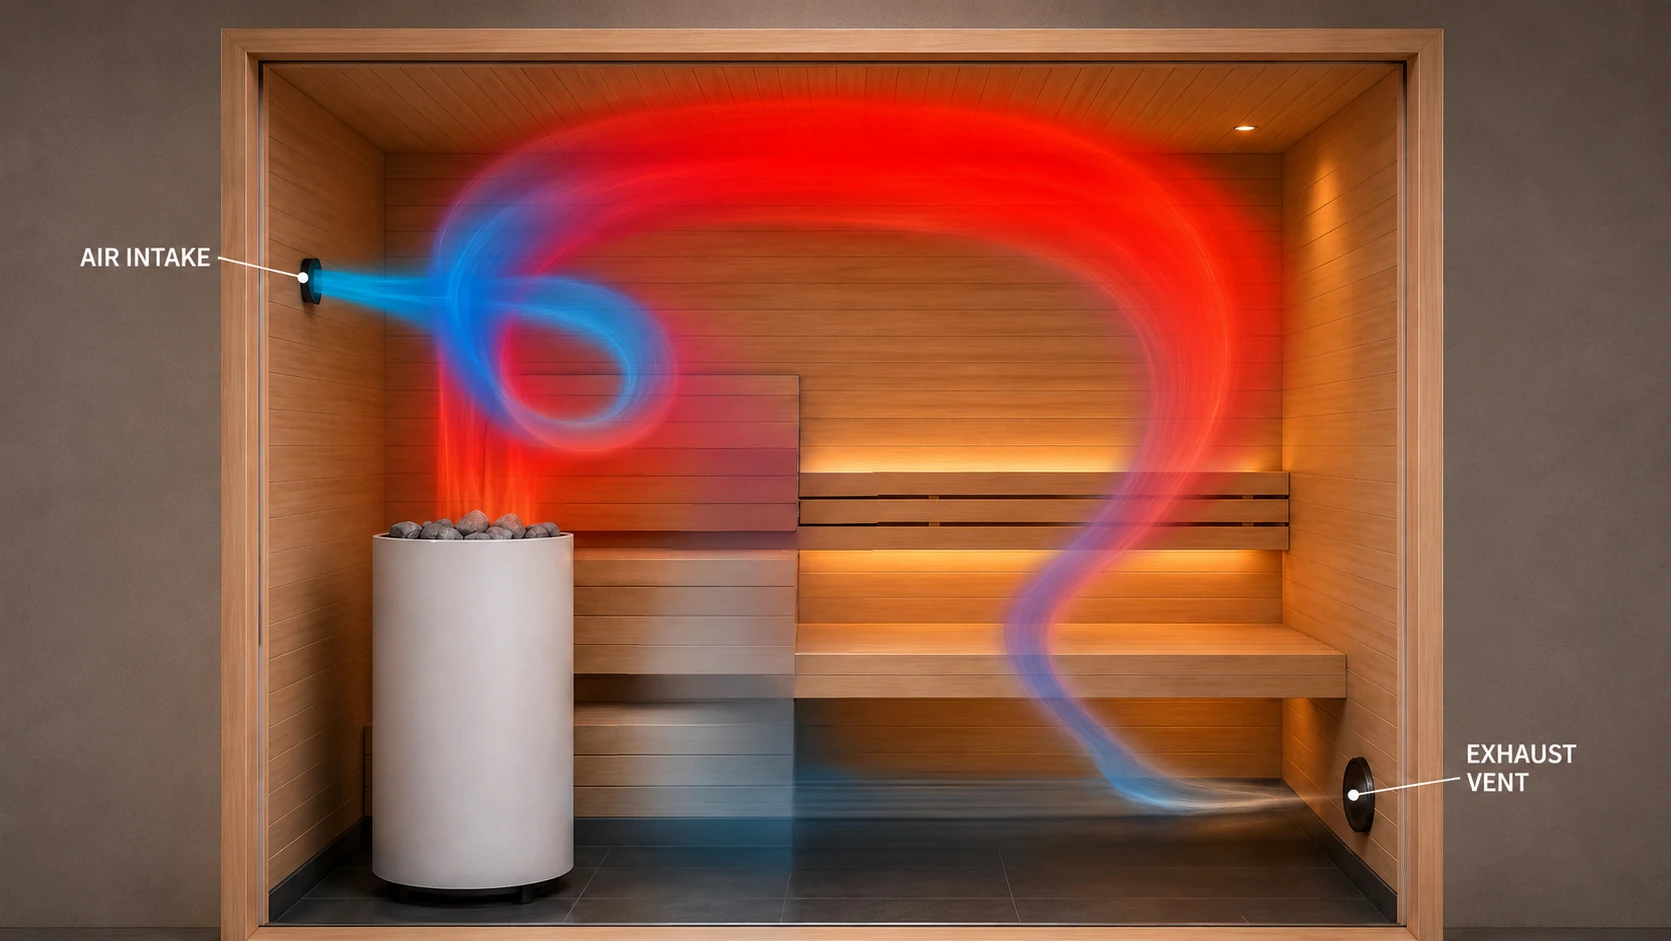
A useful way to think about sauna ventilation is as a controlled airflow path. Fresh air enters the room, mixes with heated air, moves through the bathing zone, and then leaves through the exhaust.
The exact location of the intake and exhaust depends on the ventilation method and the heater instructions, but the basic objective is the same. Air should move through the part of the sauna people actually occupy instead of taking the shortest possible route from one opening to another.
- Fresh air enters the sauna. The supply opening introduces replacement air into the room. Its position depends on whether the sauna uses gravity ventilation or mechanical exhaust and on the requirements of the heater manufacturer.
- Incoming air mixes with heated air. The heater warms the surrounding air and creates strong temperature differences inside the room. The ventilation layout should allow incoming air to become part of that circulation rather than immediately escaping.
- Air moves through the bathing zone. The useful airflow path passes through the occupied part of the sauna, including the bench area, so bathers receive replacement air while the room maintains its intended heat pattern.
- Used air reaches the exhaust. The exhaust provides a controlled route out of the sauna. Depending on the system, this may rely on natural pressure differences or a mechanical exhaust fan.
- The sauna is allowed to dry after use. Some installations use a separate drying vent, while others rely on the ventilation system or an open door after bathing. The correct method depends on the sauna design and manufacturer instructions.
This is why intake and exhaust placement should be considered as one system. A supply vent can be in a technically plausible location and still perform poorly if the exhaust encourages air to bypass the bathing zone.
Manufacturer instructions also show why a single universal diagram can be misleading. For example, Harvia specifies different supply vent positions for mechanical and gravity exhaust ventilation on some electric heater installations. Other sauna systems can use different layouts, so the heater manual should remain the final reference for the installation.
Natural vs Mechanical Sauna Ventilation
Home saunas generally use either natural airflow or mechanically assisted exhaust. Both approaches can work, but they do not necessarily use the same vent positions.
Natural or Gravity Ventilation
Natural ventilation moves air without an exhaust fan. Airflow develops through temperature and pressure differences between the hot sauna and the surrounding space, so the position of the supply and exhaust openings becomes especially important.
On some electric heater installations, the manufacturer places the supply opening below or beside the heater when gravity exhaust ventilation is used. The exhaust is then positioned away from the heater so air has a reason to travel through the room before leaving.
This does not make one low intake and low exhaust arrangement correct for every sauna. Heater instructions can specify vent dimensions, heights, drying openings, and sensor clearances that change the final layout.
Mechanical Ventilation
Mechanical ventilation uses a fan to actively remove air from the sauna. Because the exhaust is being pulled rather than relying only on natural pressure differences, the supply opening may be placed differently.
Harvia, for example, instructs installers to place the supply air vent above the heater when mechanical exhaust ventilation is used on certain electric heater installations. HUUM also specifies a higher supply position for mechanical ventilation in its current STEEL heater manual. Both manufacturers place the exhaust on the opposite side or away from the heater and close to the lower part of the room in those examples.
The important point is not that every mechanically ventilated sauna must copy those exact positions. It is that changing the ventilation method can change the required vent layout, which is why the heater and control system instructions should be checked before openings are cut into the sauna.
| Consideration | Natural or Gravity Ventilation | Mechanical Ventilation |
|---|---|---|
| What moves the air | Temperature and pressure differences move air through the sauna without an exhaust fan. | A fan actively removes air and helps establish the airflow path. |
| Supply vent position | Often lower or near the heater in manufacturer examples, but the exact position depends on the heater instructions. | May be higher, including above the heater in some manufacturer layouts. |
| Exhaust | Relies on the planned vent arrangement and natural airflow to move used air out. | The exhaust fan actively draws used air from the room. |
| Installation planning | Vent heights and relative positions are critical because there is no fan driving the exhaust. | Fan location, airflow direction, supply position, and heater sensor requirements must work together. |
| Best reference | The sauna and heater manufacturer instructions for the exact installation. | The sauna, heater, control system, and ventilation design for the exact installation. |
Where Should the Sauna Air Intake Vent Go?
The air intake should be positioned where fresh air can enter the sauna and become part of the intended circulation pattern without interfering with the heater controls or temperature sensor.
There is no single intake height that applies to every home sauna. The correct position depends first on the ventilation method, then on the heater, sensor location, room layout, and the instructions supplied with the equipment.
With gravity ventilation, some electric heater manufacturers place the fresh air supply below or beside the heater. This allows cooler incoming air to enter close to the heat source before moving through the room.
With mechanical exhaust, the supply may be positioned higher. Harvia specifies a supply opening above the heater for certain mechanically ventilated electric sauna installations, while HUUM also shows a higher supply position in its STEEL heater instructions.
Regardless of the system, several planning checks matter before the intake opening is finalized:
- Check the heater manual first. The manufacturer may specify a required supply location or a permitted range.
- Protect the temperature sensor from incoming air. A strong stream of cooler air can affect the reading if it is directed at or placed too close to the sensor.
- Plan the intake together with the exhaust. The two openings should encourage air to pass through the occupied part of the sauna rather than creating a short path directly out of the room.
- Keep the opening adjustable when the system requires it. Some sauna designs use an adjustable vent so airflow can be balanced after installation.
- Do not assume a copied diagram fits your sauna. A layout that works with one heater or ventilation method may be wrong for another.
Sensor placement deserves particular attention. On some Harvia systems, the supply air vent must be kept a specified distance from the temperature sensor unless the airflow is directed away from it. The exact clearance varies by installation, so the sensor and ventilation instructions should be reviewed together rather than treated as separate parts of the project.
Once the intake position is established, the next question is where the used air should leave the room. That exhaust location is just as important because it determines whether the fresh air actually travels through the bathing zone before exiting.
Where Should the Sauna Exhaust Vent Go?
The exhaust should be positioned so used air has to move through the sauna before leaving, while still following the layout required by the heater and ventilation system.
In many traditional sauna layouts, the exhaust is placed away from the heater and toward the lower part of the room. This helps create an airflow path from the supply area, through the bathing zone, and toward the outlet rather than allowing fresh air to leave immediately after entering.
Manufacturer examples show why the exhaust should not be planned independently from the intake. Harvia specifies an exhaust near the floor and as far from the heater as possible for certain electric heater installations. HUUM also places the exhaust on the opposite side of the sauna and near the lower part of the room in its STEEL heater ventilation layouts.
The final exhaust position should account for several practical factors:
- Distance from the supply. Enough separation helps prevent fresh air from taking a short route directly from the intake to the exhaust.
- Ventilation method. A gravity system depends on natural airflow, while a mechanical system uses an exhaust fan to pull air through the room.
- Bench and room layout. The exhaust should support airflow through the occupied zone rather than leaving stagnant areas around the benches.
- Adjacent room ventilation. Some installations exhaust through a washroom or another connected space. When a door gap forms part of that route, its required size and the need for mechanical exhaust should come from the manufacturer instructions.
- Drying after use. The bathing exhaust and the opening used to dry the sauna are not always the same. Some systems specify a separate drying vent higher in the room.
A ceiling level opening should therefore not automatically be treated as the main exhaust during bathing. In some manufacturer layouts, a high opening is intended primarily for drying after the sauna session and remains closed while the room is heating and in use.
Exhaust planning also becomes more important as the room layout changes. A larger sauna can have longer airflow paths and more bench area to serve, while an outdoor sauna may discharge air differently from an indoor installation that has to coordinate with the surrounding home. Our Indoor vs Outdoor Sauna guide covers the broader installation differences between those two locations.
With the intake and exhaust roles established, the next step is to look at complete ventilation layouts. That makes it easier to see how electric saunas with gravity or mechanical ventilation differ from wood heated installations.
Sauna Ventilation Layouts: What Changes by System?
The same sauna room can require a different ventilation layout depending on how air is moved and what type of heater is installed.
Electric Sauna With Gravity Ventilation
In a gravity system, there is no exhaust fan actively pulling air through the room. The intake and exhaust positions therefore have to support natural air movement created by temperature and pressure differences.
Some electric heater instructions place the supply opening below or beside the heater for this type of installation. The exhaust is positioned away from the heater and arranged so air can travel through the sauna before leaving. A separate opening higher in the room may be used for drying after the session rather than as the primary exhaust while bathing.
Because natural airflow is more dependent on vent position, copying the layout from a mechanically ventilated sauna can change how the room performs.
Electric Sauna With Mechanical Ventilation
When an exhaust fan is used, the system actively draws air through the sauna. This changes the pressure relationship inside the room and can also change where the fresh air supply should be located.
In manufacturer examples from Harvia and HUUM, the supply is positioned higher for certain mechanically ventilated electric sauna installations, while the exhaust is located on the opposite side or away from the heater and near the lower part of the room.
The heater sensor remains part of the ventilation plan. Incoming air should not be directed in a way that produces an inaccurate temperature reading or interferes with the control system.
Wood Heated Sauna
A wood heated sauna adds another airflow requirement because the stove needs air for combustion as well as the room needing ventilation for bathers and drying.
Wood stove manufacturer instructions commonly require an adequate source of fresh air close to the stove. The chimney, room ventilation, and available replacement air have to work together so the fire can draft correctly while the sauna remains comfortable.
Mechanical exhaust deserves particular care with a wood stove because strong negative pressure can interfere with combustion or chimney draft. The stove and chimney instructions should therefore determine how ventilation is arranged rather than applying an electric sauna layout to the room.
Does a Sauna Door Need an Air Gap?
A gap under the sauna door can form part of the ventilation path, but it should not automatically be treated as a substitute for a properly planned intake and exhaust system.
Whether a door gap is needed depends on how the sauna is ventilated and where the exhaust air is intended to go. In some installations, air leaves the sauna through the space below the door and is then removed from an adjacent washroom or other mechanically ventilated area.
Manufacturer instructions can be specific about this arrangement. Harvia and HUUM both show examples in which an exhaust located in a washroom uses a door gap of about 4 inches (100 mm), together with mechanical exhaust. That dimension belongs to those installation examples and should not be assumed to apply to every sauna door.
The important distinction is that the opening below the door becomes part of a complete airflow route. Fresh air still needs an appropriate entry point, air still needs to move through the sauna, and the connected space needs a reliable way to remove that air.
A door gap can also affect installation details beyond ventilation. Door dimensions, threshold design, finished floor height, and available interior space should be considered together when planning the room. Our Sauna Sizes and Dimensions guide covers the space planning side of a home sauna in more detail.
If the heater manufacturer specifies a door gap as part of the ventilation layout, preserve that airflow path rather than reducing it later with flooring, trim, a threshold, or another finish detail. If the door is not part of the intended exhaust route, its clearance should follow the sauna and door manufacturer requirements instead.
How Much Ventilation Does a Sauna Need?
A sauna needs enough ventilation to provide fresh air, move that air through the occupied part of the room, and remove humidity after use without carrying heat out of the sauna unnecessarily.
There is no single airflow number that should be applied to every home sauna without checking the equipment instructions. Ventilation requirements can vary with the heater, room volume, ventilation method, building conditions, and the way the sauna is intended to dry after a session.
Some current manufacturer manuals provide a useful reference point. Harvia states that the air in the sauna room should change six times per hour in certain electric heater instructions. HUUM gives the same six air changes per hour guidance in its current STEEL heater manual. These are manufacturer design instructions for the systems covered by those manuals, not a universal rule for every sauna.
In practice, the target is a balanced system rather than the largest possible amount of airflow. Too little ventilation can leave the room feeling stuffy and make drying more difficult. Too much airflow can remove heated air faster than necessary and work against the heater.
When planning the system, consider the following together:
- Sauna volume A larger room contains more air and may require a different ventilation approach than a compact cabin.
- Heater instructions Use the airflow guidance, vent sizes, and vent positions specified for the actual heater whenever the manufacturer provides them.
- Natural or mechanical ventilation Air moved by a fan behaves differently from a system that depends on gravity and pressure differences.
- Number of bathers The occupied sauna needs a reliable supply of fresh air rather than ventilation sized only around an empty room.
- Heat retention Ventilation should support comfort without creating unnecessary heat loss.
- Drying after use The room also needs a practical way to release residual humidity once bathing is finished.
Room volume matters for more than ventilation. It also affects heater sizing, particularly when the sauna includes glass, masonry, or other surfaces that can increase the effective heating load. Our Sauna Heater Size Calculator can help estimate the heater capacity for the room before equipment is selected.
For a home installation, the safest planning approach is to treat manufacturer airflow guidance as the starting point and then coordinate it with the room design and the building ventilation system. If the sauna is being integrated into a mechanically ventilated home, an HVAC professional or experienced sauna installer may need to confirm that the proposed airflow works with the rest of the building.
Traditional vs Infrared Sauna Ventilation
Traditional and infrared saunas do not create the same indoor conditions, so their ventilation requirements should not automatically be treated as identical.
Traditional Sauna Ventilation
A traditional sauna heats the room to a much higher air temperature and may add bursts of humidity when water is poured over hot stones. Ventilation therefore has several jobs at once. It supplies fresh air for bathers, supports air movement around the heater, helps distribute heat through the occupied zone, and provides a route for humid air to leave the room.
Vent placement can also interact directly with the electric heater and its temperature sensor. This is why traditional sauna heater manuals often provide specific intake and exhaust arrangements rather than leaving ventilation entirely to the room designer.
Infrared Sauna Ventilation
Infrared saunas operate differently. Infrared emitters warm the body and surrounding surfaces more directly, while the cabin typically operates at a lower air temperature than a traditional sauna. There is also no routine addition of water to hot stones in a standard infrared cabin.
That does not mean an infrared sauna should simply be sealed. Occupants still produce heat, moisture, and carbon dioxide, and the cabin still needs the airflow provisions specified by its manufacturer. Many prefabricated infrared saunas incorporate ventilation openings into the cabin itself, so adding or relocating vents without checking the installation manual can change the airflow the product was designed to use.
The practical difference is that a traditional sauna ventilation plan is often closely tied to heater placement, exhaust location, temperature sensing, and post session drying. With a prefabricated infrared sauna, ventilation is more likely to be part of the complete cabin design and should be evaluated as one of the product specifications before purchase.
If you are still deciding between the two heating methods, our Infrared Sauna vs Traditional Sauna comparison covers operating temperatures, heat experience, installation, electrical requirements, cost, and other differences that matter when choosing a home sauna.
Ventilation is therefore another reason not to choose a sauna type in isolation. The heating method, room design, electrical setup, and airflow plan all need to work together as one installation.
Indoor vs Outdoor Sauna Ventilation
Indoor and outdoor saunas need the same basic airflow functions, but the surrounding building conditions can make the installation very different.
With an indoor sauna, the ventilation plan becomes part of the home. Intake and exhaust routes may interact with adjacent rooms, mechanical ventilation, moisture control, and the path used to dry the sauna after bathing. An exhaust route should therefore be planned with the building rather than treated as an isolated opening in the sauna wall.
An outdoor sauna is more independent from the house, but it still needs deliberate intake, exhaust, and drying provisions. Exterior exposure can also make weather protection important when vents pass through the sauna envelope. The exact layout should follow the sauna and heater manufacturer instructions.
If you are still deciding where the sauna should be installed, our Indoor vs Outdoor Sauna comparison covers installation, space, climate, maintenance, cost, and other practical differences between the two locations.
In either setting, the goal is the same: give fresh air a controlled path through the sauna and provide a reliable way for heat and residual humidity to leave when needed.
Ventilation and Sauna Heater Performance
Ventilation and heater performance are closely connected because the location and movement of incoming air can affect how heat circulates through the sauna.
With an electric sauna heater, the intake should be positioned according to the heater manufacturer’s ventilation layout. Poor placement can interfere with the intended airflow pattern and may direct cooler incoming air toward a temperature sensor.
The exhaust matters as well. If air leaves the room too quickly or through a poorly planned route, useful heat can be carried out before it circulates through the bathing zone. Too little airflow can create the opposite problem, with stale air and uneven conditions inside the sauna.
Ventilation also cannot compensate for an incorrectly sized heater. Room volume, glass surfaces, masonry, insulation, and heater output should be evaluated separately when planning the installation.
The practical rule is to plan the heater, temperature sensor, intake, and exhaust as one system rather than deciding each component independently.
Ventilation and Sauna Size
Sauna size affects the amount of air inside the room, but room volume alone does not determine the ventilation layout.
A larger sauna may need greater airflow capacity than a compact cabin, especially when more people use the room at the same time. Vent size and placement still need to match the heater, ventilation method, and manufacturer instructions.
This is why ventilation should be planned from the actual finished sauna dimensions rather than from capacity labels such as two person or four person. Ceiling height, bench layout, glass area, and the location of the heater can all change how air moves through the occupied zone.
Common Sauna Ventilation Mistakes
Most sauna ventilation problems come from a few planning mistakes that interrupt the intended airflow path or make it harder for the room to dry after use.
- Copying a generic vent layout Vent positions should match the actual heater, ventilation method, and manufacturer instructions.
- Placing intake and exhaust too close together Fresh air can leave before it moves through the occupied part of the sauna.
- Directing cool air toward the temperature sensor Incoming air can affect sensor readings on systems where the manufacturer specifies clearance from the supply vent.
- Using too much airflow More ventilation is not always better. Excess airflow can carry useful heat out of the room too quickly.
- Ignoring the drying strategy The sauna still needs a way to release residual humidity after the bathing session ends.
- Treating a door gap as the entire system A gap under the door only works as intended when it forms part of a complete supply and exhaust route.
Signs Your Sauna May Have Poor Ventilation
Poor ventilation is not always obvious from the vent openings themselves. It often becomes noticeable through the way the sauna feels during use or how slowly it dries afterward.
- Stale or stuffy air. The room feels uncomfortable even though the temperature itself is normal.
- Persistent temperature imbalance. The upper bench is very hot while the lower part of the sauna remains unusually cool.
- Condensation that lingers. Moisture remains on glass, walls, or other surfaces long after the session ends.
- Slow drying. Benches, floors, or other surfaces stay damp for an extended period after use.
- Unexpected heater or sensor behavior. Poorly positioned incoming air may interfere with temperature sensing on some systems.
How to Troubleshoot Sauna Airflow
When a sauna does not feel properly ventilated, the first question is whether the room is behaving differently from the way the installed system was designed to operate.
An intake or exhaust that has been partially covered is an obvious place to look, but vent position matters just as much. Compare the finished installation with the heater and sauna documentation, including the location of the temperature sensor. This is particularly important if a fan has been added or the surrounding room ventilation has changed since the sauna was installed.
Problems that appear mainly after bathing point in a different direction. If benches and other surfaces remain damp for a long time, check whether the drying route specified for the sauna is actually open and being used after each session.
If the installation matches the manufacturer layout and the problem remains, changing vent positions by trial and error is a poor next step. At that point, the airflow should be assessed as part of the complete sauna and building ventilation system.
Planning Ventilation Before You Buy a Home Sauna
Ventilation is easier to solve before a sauna is ordered than after the heater, benches, walls, and controls have fixed most of the room layout.
For a prefabricated sauna, check how the manufacturer expects air to enter and leave the cabin and whether those openings will remain usable in the planned location. For a built in sauna, the intake, exhaust, drying route, heater, and temperature sensor should be coordinated before the wall and ceiling assemblies are closed.
This is also the point to consider what sits outside the sauna. An indoor installation may depend on an adjacent room or the home’s mechanical ventilation, while an outdoor sauna needs vent openings that can function without creating an obvious path for weather into the structure.
Ventilation belongs on the pre purchase checklist alongside electrical supply, finished dimensions, heater requirements, flooring and drainage, and service access. Our What to Know Before Buying a Home Sauna guide brings those broader installation decisions together before you commit to a particular sauna.
Sauna Ventilation Checklist
Before the sauna is finished, these are the ventilation details worth confirming against the plans and manufacturer instructions.
- Ventilation method Confirm whether the sauna is designed around natural airflow or mechanical ventilation.
- Fresh air intake Check that the intake position matches the heater and ventilation method being installed.
- Exhaust location Make sure used air has a clear route out of the sauna rather than circulating back toward the intake.
- Temperature sensor Verify that incoming air will not interfere with the sensor position specified for the heater.
- Door airflow If the design relies on air passing beneath the door, confirm that the finished installation preserves that path.
- Drying route Know how moisture will leave the room after bathing and which openings should remain open while the sauna dries.
- Clear openings Check that trim, benches, wall finishes, or nearby objects will not obstruct the planned vents.
- Final documentation check Compare the completed layout with the current sauna and heater instructions before regular use.
Conclusion
Sauna ventilation works best when it is treated as part of the installation rather than as a pair of openings added after the room is built. The heater, intake, exhaust, temperature sensor, benches, door, and surrounding space all influence how air moves through the sauna.
There is no single vent arrangement that applies to every home sauna. Natural and mechanical ventilation can require different layouts, and a configuration that works with one heater may be unsuitable for another. That is why manufacturer instructions should take priority over generic diagrams or rules of thumb when the final positions are chosen.
The practical goal is straightforward: bring fresh air into the room without disrupting heater controls, move that air through the occupied space, give used air a clear way out, and make sure moisture can leave after bathing. When those parts work together, ventilation supports comfort during the session as well as drying afterward.
For a new installation, these decisions are easiest to resolve before the sauna is ordered or the walls are closed. For an existing sauna with stale air, uneven temperatures, persistent condensation, or slow drying, compare the finished installation with the original sauna and heater documentation before changing vent or sensor positions.
Home sauna ventilation questions
Does a home sauna need ventilation?
Yes. A sauna needs a planned path for fresh air to enter and used air to leave. Ventilation also affects heat distribution and gives moisture a route out of the room after bathing.
Where should fresh air enter a sauna?
The correct intake position depends on the heater and whether the sauna uses natural or mechanical ventilation. Manufacturer layouts commonly place the supply air in relation to the heater so incoming air can mix with heated air, but the exact height and position are system specific.
Where should the exhaust vent go in a sauna?
There is no single exhaust position for every sauna. Its location depends on the ventilation method, heater, and room layout. The exhaust should form a useful airflow path through the sauna rather than allowing incoming air to leave before it reaches the occupied space.
Does a sauna door need an air gap?
Only when the ventilation design calls for one. Some installations use the space beneath the door as part of the exhaust route, while others use dedicated vents. A door gap should therefore be treated as a component of a specific ventilation layout, not as a universal requirement.
How much ventilation does a sauna need?
The required airflow depends on the sauna and ventilation system. Some manufacturer guidance for electric saunas uses six air changes per hour, but that figure should not replace the ventilation requirements for the exact heater and sauna being installed.
Is mechanical ventilation better than natural ventilation?
Not automatically. Both can work when the intake and exhaust are designed for that method. Mechanical ventilation gives greater control over airflow, while natural ventilation can be appropriate where the sauna and surrounding building support it.
Do infrared saunas need ventilation?
Infrared cabins still need air exchange, but their ventilation requirements can differ from those of a traditional sauna with a high output electric or wood heater. For a prefabricated infrared sauna, preserve the ventilation openings and installation clearances specified by the manufacturer.
How should a sauna be dried after use?
Use the drying method intended for the installation. Depending on the sauna, that may involve a designated drying vent, mechanical exhaust, leaving the door open, or another manufacturer specified procedure. The goal is to let retained heat and airflow remove moisture rather than leaving surfaces damp for an extended period.
Sources & methodology
Verdict Lux reviewed current manufacturer ventilation guidance and installation documentation for residential saunas, focusing on gravity versus mechanical airflow, intake and exhaust placement, air-exchange guidance, temperature-sensor interaction, door airflow, wood-heater combustion, and post-session drying. Because manufacturers use different airflow layouts for different heaters and ventilation systems, the positions and dimensions discussed in this guide are treated as model-specific planning examples rather than universal rules. We did not measure airflow or perform on-site ventilation testing for this article.
We compared current technical guidance for electric and wood-heated saunas, natural and mechanically assisted ventilation, supply and exhaust routing, drying, door-gap examples, and temperature-sensor clearances. Numerical values such as six air changes per hour, vent diameters, sensor distances, or a 100 mm door gap are used only where the cited manufacturer specifies them and are not generalized to every sauna. For final installation, the exact sauna, heater, control, and building-ventilation instructions take priority.
Use the layouts and dimensions in this guide to understand the design choices, not as a substitute for the current manual. Before cutting vents or changing an existing system, verify the exact heater and control documentation, ventilation method, sensor location, required vent sizes and positions, door-airflow path, drying strategy, and any interaction with the building’s mechanical ventilation. Wood-heated saunas require particular care because room pressure and exhaust systems can affect combustion and chimney draft.