Sauna Flooring Requirements: Best Floors for Your Home Sauna
Sauna flooring requirements depend on the installation, from moisture and drainage to heat, slip resistance, waterproofing, and the floor beneath the sauna.
What Does a Sauna Floor Actually Need?
A sauna floor needs to provide a stable, practical surface for the installation while handling the heat, moisture, cleaning, and foot traffic expected in that particular sauna. What that means in practice depends heavily on the type of sauna and how much water the floor is likely to encounter.
A prefabricated infrared cabin placed on an existing finished floor does not necessarily need the same floor assembly as a custom traditional sauna where water may be thrown on the heater, benches and floor during use. An outdoor sauna introduces another set of considerations, including the foundation, ground moisture, weather exposure, drainage around the structure, and freeze-thaw conditions in colder climates.
That is why there is no single flooring material or drainage detail that should be treated as a universal requirement for every home sauna. The floor should be selected as part of the complete sauna installation rather than as a decorative finish chosen in isolation.
In most projects, the floor needs to address six practical questions:
- Heat. Can the floor and the materials beneath it tolerate the temperatures and heater conditions specified for the installation?
- Moisture. How much water, condensation, and routine cleaning will the floor actually experience?
- Drainage. Does this particular sauna need a drain or sloped floor, or is a dry, level installation specified by the manufacturer?
- Footing. Will the finished surface remain practical and reasonably slip resistant when bathers are barefoot and the floor is damp?
- Support. Can the underlying floor or foundation safely support the sauna, benches, heater, stones, occupants, and other installed components?
- Cleaning and drying. Can water, dirt, and debris be removed easily, and can the floor dry properly after the sauna is used?
The first step, then, is not choosing between tile, concrete, or wood. It is identifying the type of sauna you are installing and the conditions the floor will actually have to handle. That distinction becomes especially important when comparing indoor and outdoor sauna installations , because the floor beneath the sauna may be part of the house in one project and part of the building structure or foundation in another.
The Flooring Requirement Depends on the Type of Sauna
Before choosing a flooring material, identify what kind of sauna is actually being installed. The visible surface is only one part of the decision. A factory-built cabin may simply sit on a suitable existing floor, while a custom hot room can require a purpose-built floor assembly that accounts for water, cleaning, drainage, waterproofing, and the sauna heater.
Prefabricated Indoor Sauna
Many prefabricated indoor saunas are designed as complete cabins that sit on an existing finished floor. In that situation, the important question is often not what flooring goes inside the sauna, but whether the floor underneath the unit is level, stable, dry, suitable for the sauna’s weight, and permitted by the manufacturer.
Tile and concrete are common practical surfaces because they are durable and easy to clean, but the manufacturer’s installation instructions should determine whether a particular existing floor is acceptable.
Custom-Built Traditional Sauna
A custom traditional sauna can place much greater demands on the floor assembly. Water may reach the floor during bathing and cleaning, and the floor may need to work together with waterproofing, drainage, ventilation, and heater protection details. In these projects, choosing an attractive finish without considering what is beneath it can create problems later.
Infrared Sauna
Infrared cabins are typically used with less water than traditional saunas, so their flooring requirements can be quite different. Many models are intended for relatively dry indoor spaces and may be placed over an approved existing floor. That does not mean every hardwood, laminate, vinyl, or carpeted surface is automatically suitable; the cabin manufacturer should specify the acceptable installation surface and any clearance or moisture limitations.
Outdoor Sauna
Outdoor sauna flooring has to be considered together with the structure beneath it. Depending on the design, that may mean a concrete slab, framed floor, piers, foundation system, or another manufacturer-approved base. Rain, snow, ground moisture, freeze-thaw cycles, drainage around the building, and drying beneath a raised floor can matter as much as the material visible inside the sauna.
| Installation | Typical Floor Situation | Water Exposure | Drain? | Main Flooring Concern |
|---|---|---|---|---|
| Prefab indoor sauna | Cabin placed on an existing finished floor or manufacturer-specified base | Usually limited, depending on sauna type and use | Often not required, but follow the manufacturer | Level support, moisture suitability, cleanability, and manufacturer approval |
| Custom traditional sauna | Purpose-built floor assembly | Potentially moderate to high during bathing and cleaning | May be useful or required depending on design and local requirements | Waterproofing, drainage strategy, heater area, and drying |
| Infrared sauna | Often installed on an approved existing indoor floor | Typically low | Usually not part of a standard cabin installation | Suitable support surface, heat tolerance, and manufacturer instructions |
| Outdoor sauna | Slab, framed floor, piers, foundation, or manufacturer-specified base | Interior moisture plus exterior weather and ground conditions | Depends on sauna design, water use, and floor construction | Foundation, exterior drainage, moisture, weather, and freeze-thaw exposure |
These are planning distinctions rather than universal construction rules. The sauna manufacturer’s instructions, heater requirements, local building rules, and the actual amount of water used in the sauna should determine the final floor assembly.
Best Sauna Flooring Materials
The best sauna flooring material depends on what the finished surface is expected to do. Tile and concrete can provide durable, moisture-tolerant bases, while wood can create a warmer surface underfoot when it is used as part of an appropriate floor design. In some saunas, these materials are combined: a waterproof or durable base handles the building-side requirements while removable wooden duckboards provide the surface bathers actually walk on.
No material should be judged only by how it looks inside the sauna. Heat tolerance, moisture exposure, slip resistance, cleaning, the floor assembly below the finish, and the sauna manufacturer’s instructions all matter.
Porcelain and Ceramic Tile
Tile is one of the most practical finishes for a purpose-built indoor sauna because it is durable, easy to clean, and well suited to floor assemblies designed to handle moisture. Porcelain tile is especially useful where low water absorption is desirable, but the finished tile surface is only part of the system.
Grout joints, transitions, penetrations, the substrate, and any required waterproofing below the tile still have to be detailed correctly. Tile itself should not be treated as proof that the entire floor assembly is waterproof.
Surface texture also matters. A highly polished tile can be uncomfortable or slippery when wet, so flooring intended for barefoot sauna use should be selected with wet-foot traction and cleaning in mind.
Sealed Concrete
Concrete can be an excellent sauna base where the building or sauna design already provides a slab. It is structurally robust, easy to integrate with many custom installations, and can work well in indoor utility spaces and outdoor sauna projects.
Bare concrete, however, can feel cool and hard underfoot. A properly selected finish or sealer may make cleaning easier, while removable wooden walking surfaces can improve barefoot comfort without hiding the underlying floor permanently.
For outdoor installations, the slab also has to be considered as part of the site and foundation strategy. Water should not simply collect around the sauna because the interior happens to sit on concrete.
Wood Flooring and Removable Duckboards
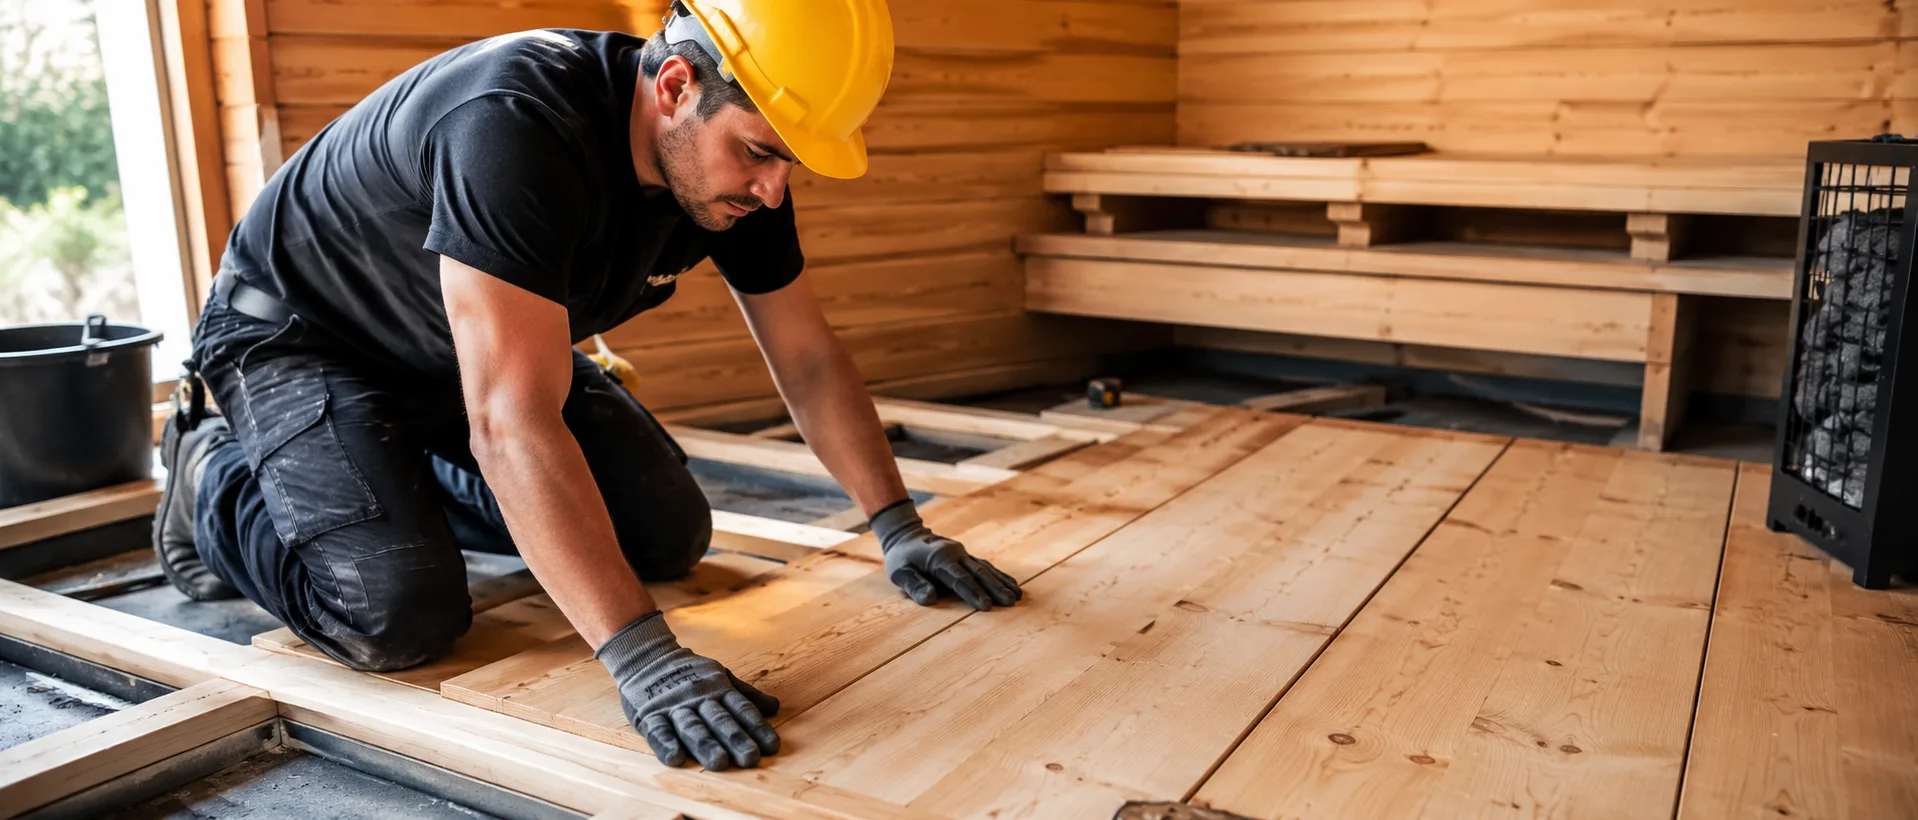
Wood gives a sauna the warm barefoot feel many people expect, but there is an important distinction between a structural wooden floor and a removable wooden walking surface. A slatted duckboard can sit above tile, concrete, or another suitable base and be lifted for cleaning and drying. That is very different from assuming that ordinary residential hardwood flooring can serve as the moisture-management layer of a custom sauna.
Sauna walking surfaces may use species such as alder, cedar, or other sauna-suitable woods, depending on the manufacturer and construction. The important characteristics are not simply the species name, but how the wood behaves under heat and moisture, how hot the surface becomes, whether fasteners are safely detailed, and whether the assembly can be cleaned and dried.
- They can provide a warmer and more comfortable barefoot surface over tile or concrete.
- Slatted construction allows water and debris to pass to the floor below instead of remaining on the walking surface.
- Removable sections make it easier to clean and inspect the underlying floor.
- Individual sections can be dried, maintained, or replaced without rebuilding the entire floor assembly.
Pretreating Sauna Floorboards Before Installation
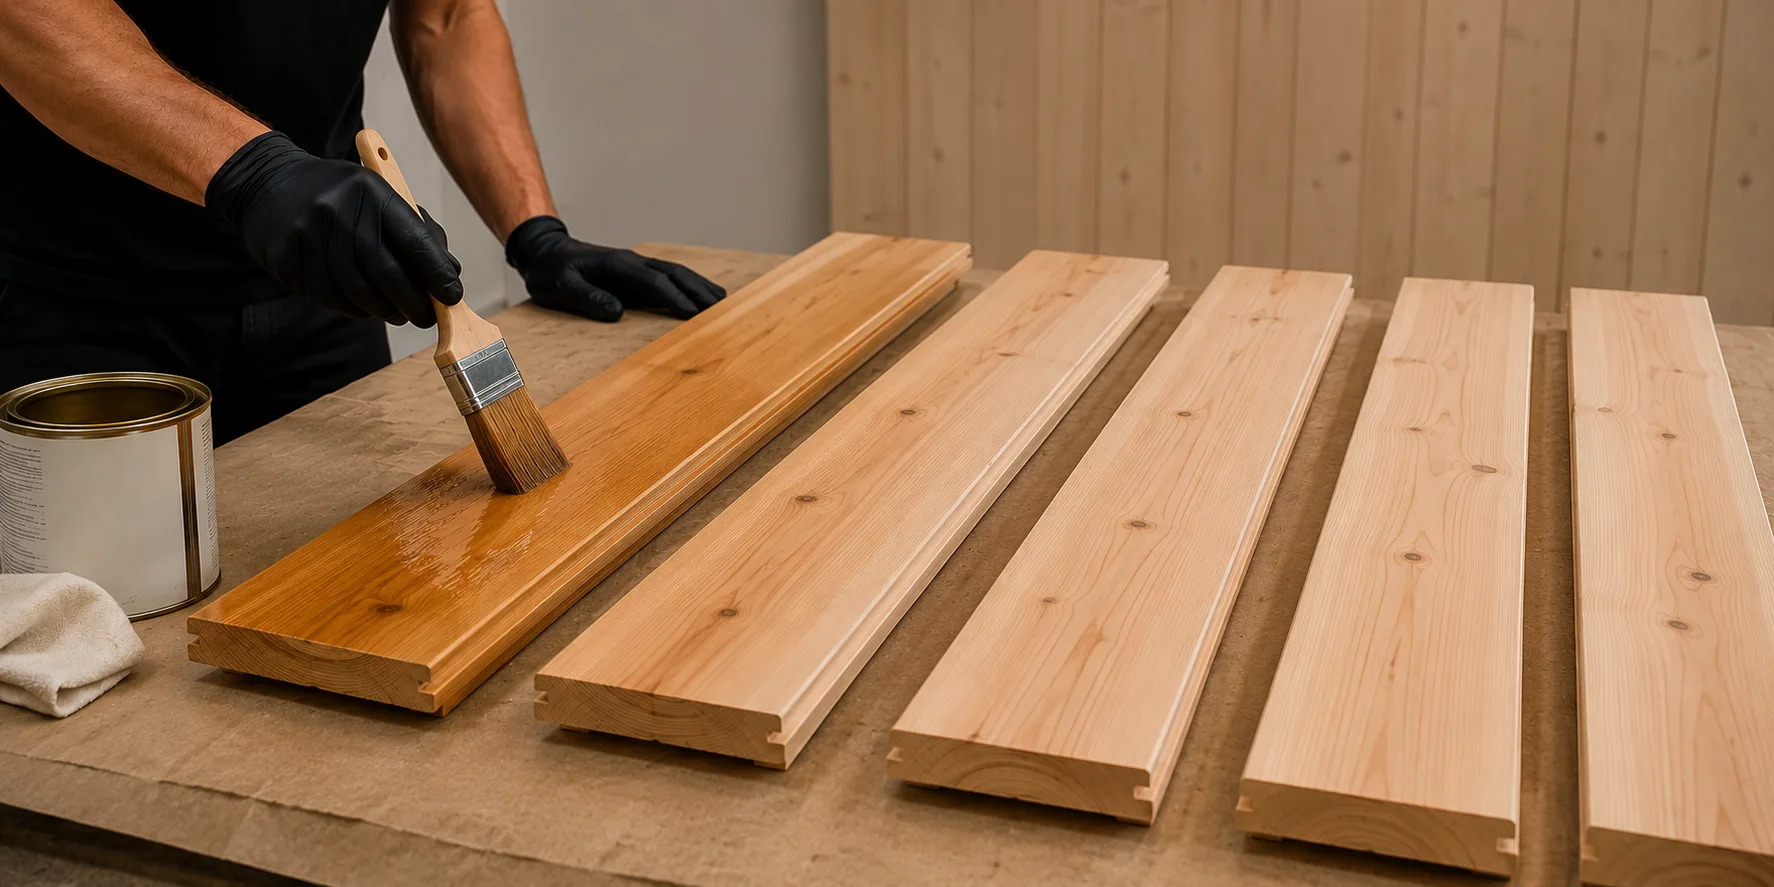
Where a sauna floor design uses finish-treated wooden boards, pretreating them before installation can make it easier to reach faces, edges, and other areas that become difficult to access once the floor is assembled. The treatment itself must be appropriate for the wood, the sauna environment, and the product manufacturer’s intended use.
This is also the point where construction details matter. Treating visible boards does not replace the need for a suitable floor structure beneath them, and coatings or finishes should not be assumed safe for sauna use simply because they are sold for ordinary interior wood.
Applying a Second Treatment After the Boards Are Installed
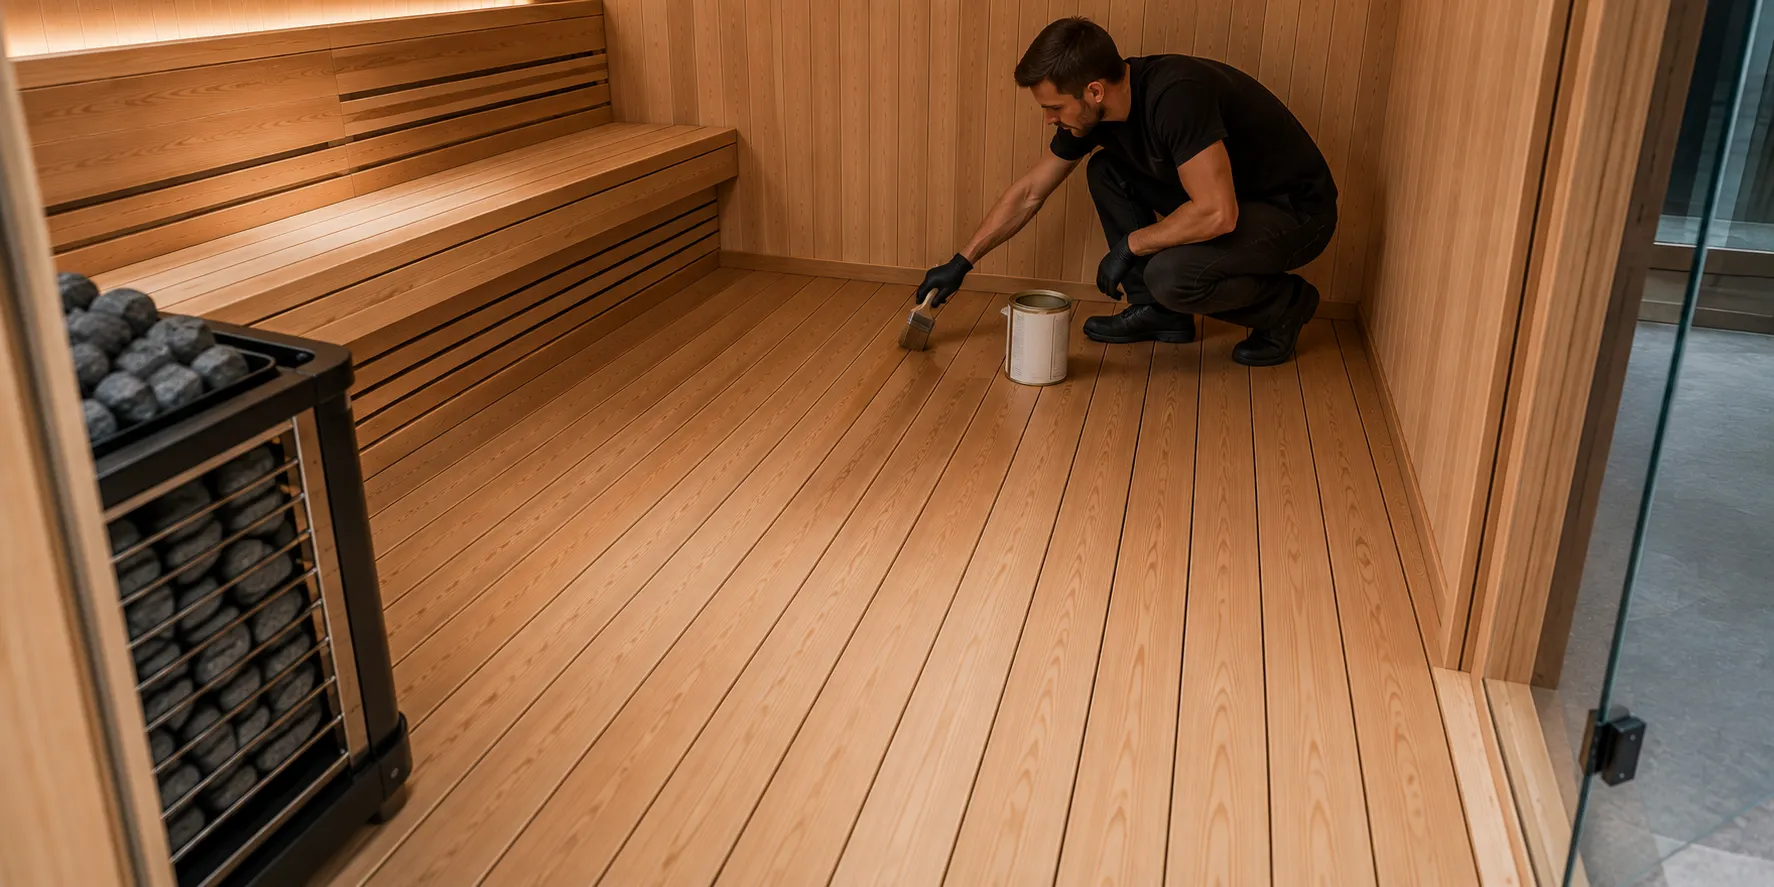
If the specified finishing system calls for another application after installation, the second treatment can be completed once the boards are fixed in place and the surface is clean and ready. A practical working sequence starts at the area farthest from the exit and progresses toward the doorway so the installer does not have to step back across the freshly treated surface.
Drying time, ventilation during application, surface preparation, and the number of coats should come from the finish manufacturer’s instructions rather than from a universal sauna rule.
Natural Stone
Natural stone can create a durable premium finish, but its suitability depends on the particular stone, surface texture, installation system, and maintenance requirements. Like tile, stone is not automatically a complete waterproofing solution simply because the surface itself tolerates water.
Smooth stone may also become slippery when wet, while highly textured stone can be harder to clean. For many home saunas, stone therefore makes more sense as a carefully specified architectural finish than as an automatic upgrade over porcelain tile or concrete.
Vinyl, LVP, PVC and Rubber
Resilient flooring requires more caution. Products within the vinyl, luxury vinyl plank, PVC, and rubber categories can have very different temperature limits, adhesives, emissions characteristics, moisture requirements, and installation restrictions.
A product being marketed as waterproof does not by itself make it suitable for a sauna. Before using resilient flooring inside or directly beneath a sauna, confirm both the flooring manufacturer’s temperature and installation limits and the sauna manufacturer’s requirements. If either manufacturer excludes the application, a different floor system is the safer choice.
Sauna Flooring Comparison
No single flooring material is best in every sauna. Tile and concrete are strong choices where durability and moisture management matter most, while removable wood surfaces can improve barefoot comfort over a more resilient base. Natural stone can work well in carefully specified installations, and resilient products such as vinyl or rubber should be used only when both the flooring and sauna manufacturers allow the application.
| Flooring | Heat | Moisture | Barefoot Comfort | Cleaning | Indoor | Outdoor | Main Drawback |
|---|---|---|---|---|---|---|---|
| Porcelain / ceramic tile | Excellent | Excellent when installed as part of a suitable assembly | Moderate; can feel cool and hard | Excellent | Excellent | Good where the installation and climate permit it | The tile surface does not by itself make the floor assembly waterproof, and polished finishes can be slippery. |
| Sealed concrete | Excellent | Excellent when properly detailed | Low to moderate without a removable walking surface | Very good | Very good | Excellent for many slab-based installations | Hard and cool underfoot, and site drainage still has to be handled correctly. |
| Wood / removable duckboards | Good when sauna-suitable wood and detailing are used | Depends on the assembly below and the ability to dry | Excellent | Good when removable | Excellent as a walking surface over a suitable base | Good when designed for the exposure | Wood should not be treated as a substitute for waterproofing, drainage, or a suitable structural floor. |
| Natural stone | Excellent | Very good with a suitable installation system | Moderate; varies by surface and stone | Good to very good | Very good | Good to very good depending on stone and climate | Surface texture, sealing, maintenance, and slip resistance vary significantly by material. |
| Vinyl / LVP / PVC / rubber | Conditional | Often good at the surface, depending on product | Good | Very good | Conditional | Usually not preferred unless specifically approved | Temperature limits, adhesives, emissions characteristics, and sauna-manufacturer restrictions vary widely. |
These ratings are practical planning comparisons, not universal manufacturer approvals. Final suitability depends on the sauna design, heater, amount of water used, underlying floor assembly, local requirements, and the instructions for the specific flooring and sauna products.
Does a Sauna Floor Need to Be Waterproof?
Not every home sauna needs the same waterproof floor assembly. The answer depends on how the sauna is built, how much water is expected to reach the floor, what is underneath it, and what the sauna manufacturer requires.
A prefabricated cabin used in a relatively dry indoor setting may simply require a stable, suitable finished floor beneath the unit. A custom traditional sauna that is washed down regularly or exposed to more water may need a floor assembly designed much more like a wet area.
The important distinction is between a surface that tolerates moisture and a floor assembly that is actually designed to control water. Tile, stone, sealed concrete, or another water-resistant finish does not automatically make the construction beneath it waterproof.
Water-Resistant Surface vs Waterproof Floor Assembly
A water-resistant finish can make the visible floor easier to clean and less vulnerable to occasional moisture. Waterproofing is a broader construction function: it is intended to prevent water from reaching materials or spaces that should remain dry.
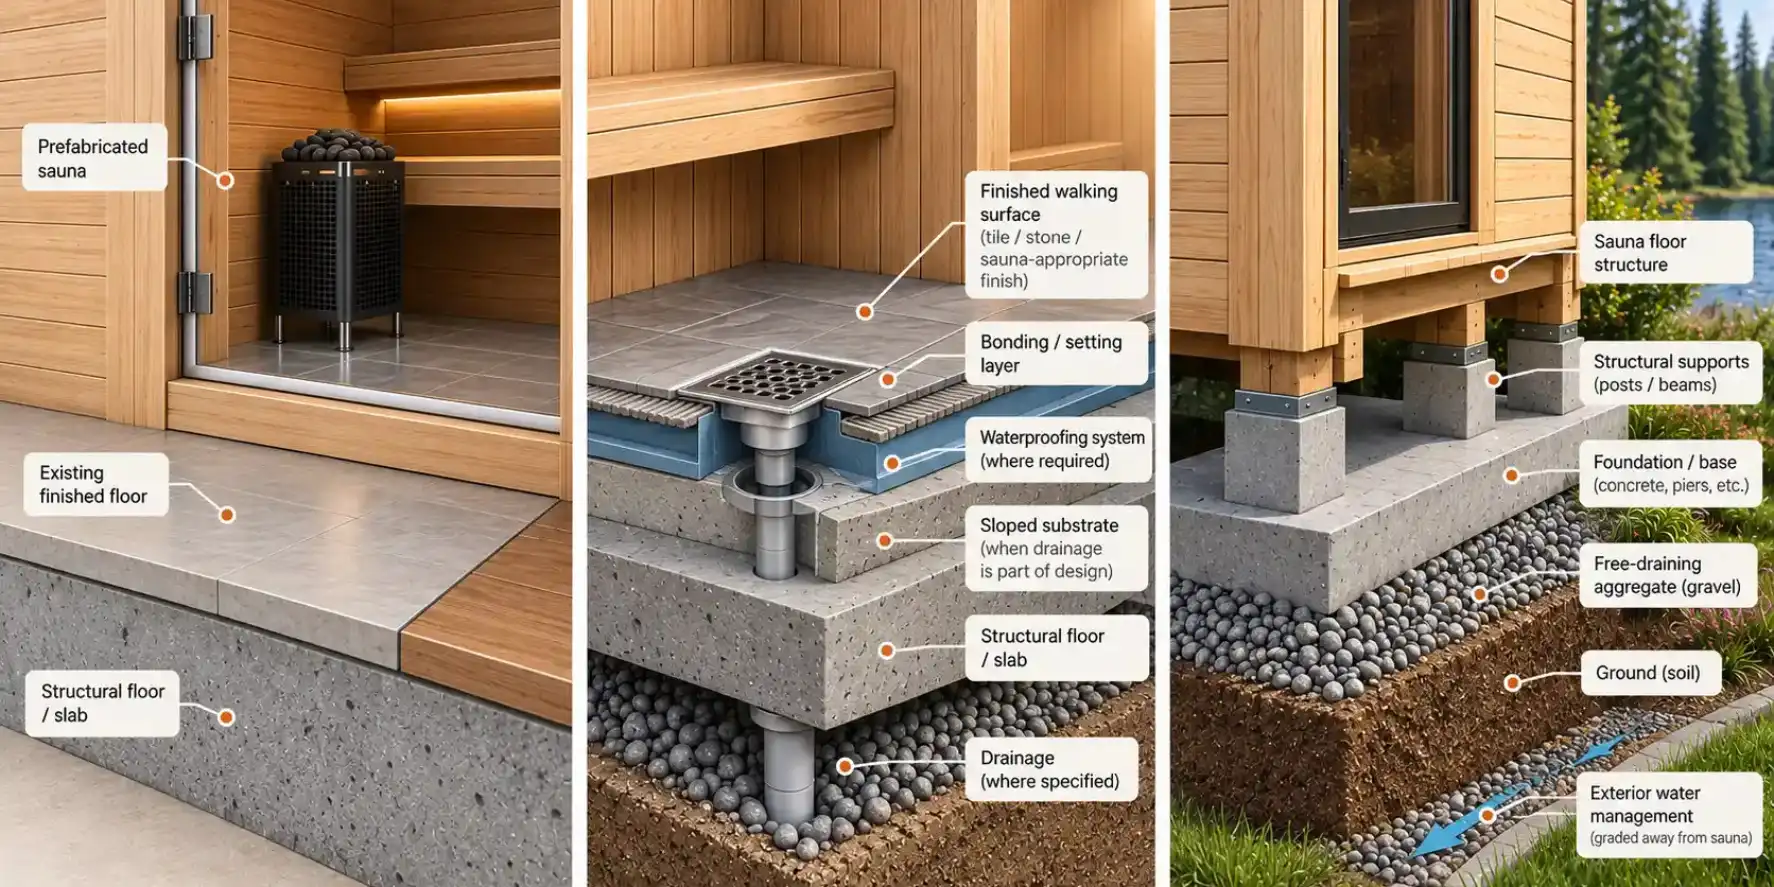
In a purpose-built sauna where waterproofing is required, the finished floor is therefore only one layer of the system. The exact materials and sequence vary by project, but the planning logic commonly involves the following elements:
- Finished walking surface. Tile, stone, sealed concrete, removable wood sections, or another sauna-appropriate finish provides the surface that is exposed to feet, cleaning, heat, and moisture.
- Waterproofing layer where required. In floor assemblies designed to manage significant water, a membrane or other approved waterproofing system may be installed beneath the finish according to the building system being used.
- Subfloor, slab, or structural floor. This is the load-bearing part of the assembly. It must support the sauna and remain compatible with the moisture, heat, and finish system above it.
- Drainage where required by the design. If the sauna uses a drain, the floor assembly has to direct water to it without leaving uncontrolled low spots or sending water into adjacent construction.
When Waterproofing Becomes More Important
Waterproofing becomes more important as the expected water exposure increases. That can include saunas that are washed frequently, installations where bathers routinely use generous amounts of water, floors above moisture-sensitive rooms, or custom builds where the sauna is integrated into a bathroom or other wet-area construction.
In contrast, a factory-built sauna intended to sit on an existing dry indoor floor may have very different requirements. The manufacturer may call for a level, finished surface without treating the room below the cabin as a wet-area assembly.
The safest planning approach is to determine the sauna type first, then confirm the manufacturer’s floor requirements and coordinate any required waterproofing with the rest of the building assembly rather than adding it as an afterthought.
Does a Sauna Need a Floor Drain?
A floor drain can be useful in a sauna, but it should not be treated as a universal requirement. Whether a drain belongs in the room depends on the sauna design, the amount of water expected on the floor, how the space will be cleaned, the floor assembly, and the manufacturer’s installation requirements.
In a purpose-built traditional sauna, a drain can make water management and cleaning easier when the floor is designed to direct water toward it. In other installations, particularly factory-built cabins intended for relatively dry indoor use, the manufacturer may specify a level finished floor without a drain.
The key point is that a drain only works properly when the surrounding floor is designed as part of the same water-management system. Adding a drain to an otherwise unsuitable floor does not automatically solve waterproofing, slope, or moisture problems.
When a Drain Makes Sense
A drain becomes more useful as the expected amount of water increases. That can include custom traditional saunas where bathers use water freely, rooms that are washed down during cleaning, or sauna installations integrated into a bathroom or other wet-area design.
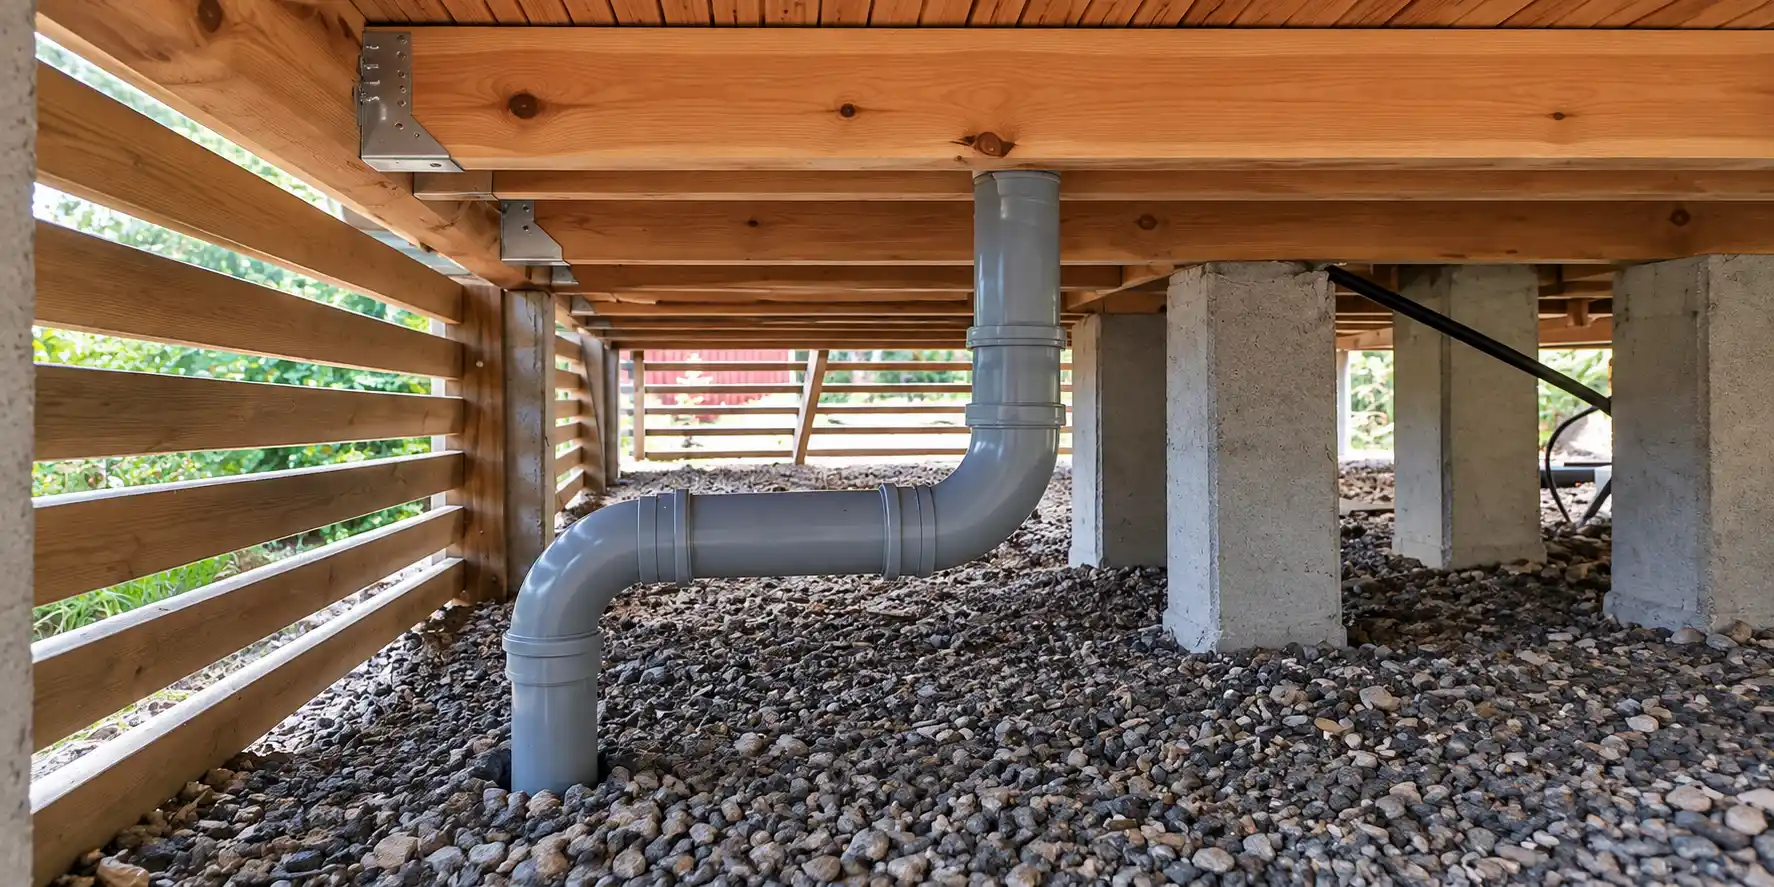
In those situations, the drain should work together with the finished surface, waterproofing where required, and the floor geometry intended to move water toward the outlet. The location of the drain, the connection to the plumbing system, and the surrounding floor construction should be planned before the finish is installed rather than added later as an isolated component.
A drain can also make routine cleaning more practical, especially in larger custom saunas where water used for washing the floor would otherwise have to be removed manually.
When a Drain May Not Be Required
Some sauna installations are intentionally designed without a floor drain. A prefabricated infrared or traditional cabin may be installed over a suitable existing indoor floor and used with relatively little water, making a dedicated drain unnecessary unless the manufacturer specifies otherwise.
Even among purpose-built saunas, there is no universal rule that every floor must slope to a drain. Some sauna manufacturers specify a flat or level floor and recommend against adding a drain to their particular system. That is an important reminder that generic sauna diagrams should not override the construction requirements for the actual product being installed.
If a sauna is installed without a drain, the remaining water-management questions still matter: the floor should tolerate the expected moisture, cleaning should be practical, and the room should be able to dry properly after use.
Why Manufacturer Instructions Come First
Drainage is one of the areas where sauna advice can become misleading when a recommendation is presented as universal. A drain that makes sense in one custom wet-area sauna may conflict with the installation instructions for a factory-built sauna designed to sit on a level finished floor.
Before deciding whether to add a drain, confirm the sauna manufacturer’s floor requirements, the intended amount of water used in the sauna, the plumbing and waterproofing strategy, and any applicable local building requirements. The floor, drain, and surrounding construction should be treated as one coordinated system rather than separate decisions.
Should a Sauna Floor Be Sloped?
A sauna floor should be sloped only when the drainage strategy calls for it. In a purpose-built sauna with a floor drain, the floor may be formed so water moves toward the outlet instead of collecting in low spots. But a slope is not a universal requirement for every sauna.
Prefabricated cabins are often designed to sit on a flat, level surface, and some manufacturers specifically require that condition. Creating a slope simply because it is common in wet rooms can therefore be the wrong approach for a sauna that was engineered for a level base.
When a Sloped Floor Makes Sense
A sloped floor is most relevant when water is intentionally being directed to a drain or drainage channel. This is more common in custom traditional saunas, wet-area installations, and rooms where the floor is regularly washed. In those projects, the slope should be coordinated with the waterproofing, drain location, finished surface, thresholds, and surrounding construction.
The required fall should come from the specific floor and drainage design rather than from a universal sauna number. The goal is controlled drainage without creating awkward transitions, unstable walking surfaces, or conflicts with the sauna structure.
When the Floor Should Remain Level
If the sauna manufacturer specifies a level finished floor, that instruction should take priority over generic advice to slope the room. This is particularly important for prefabricated cabins whose wall panels, doors, benches, and heater clearances depend on the unit being assembled on a stable, level base.
In short, the presence of a sauna does not by itself determine whether the floor should slope. The drainage system and the sauna manufacturer’s installation requirements do.
The Sauna Floor, Löyly and Ventilation
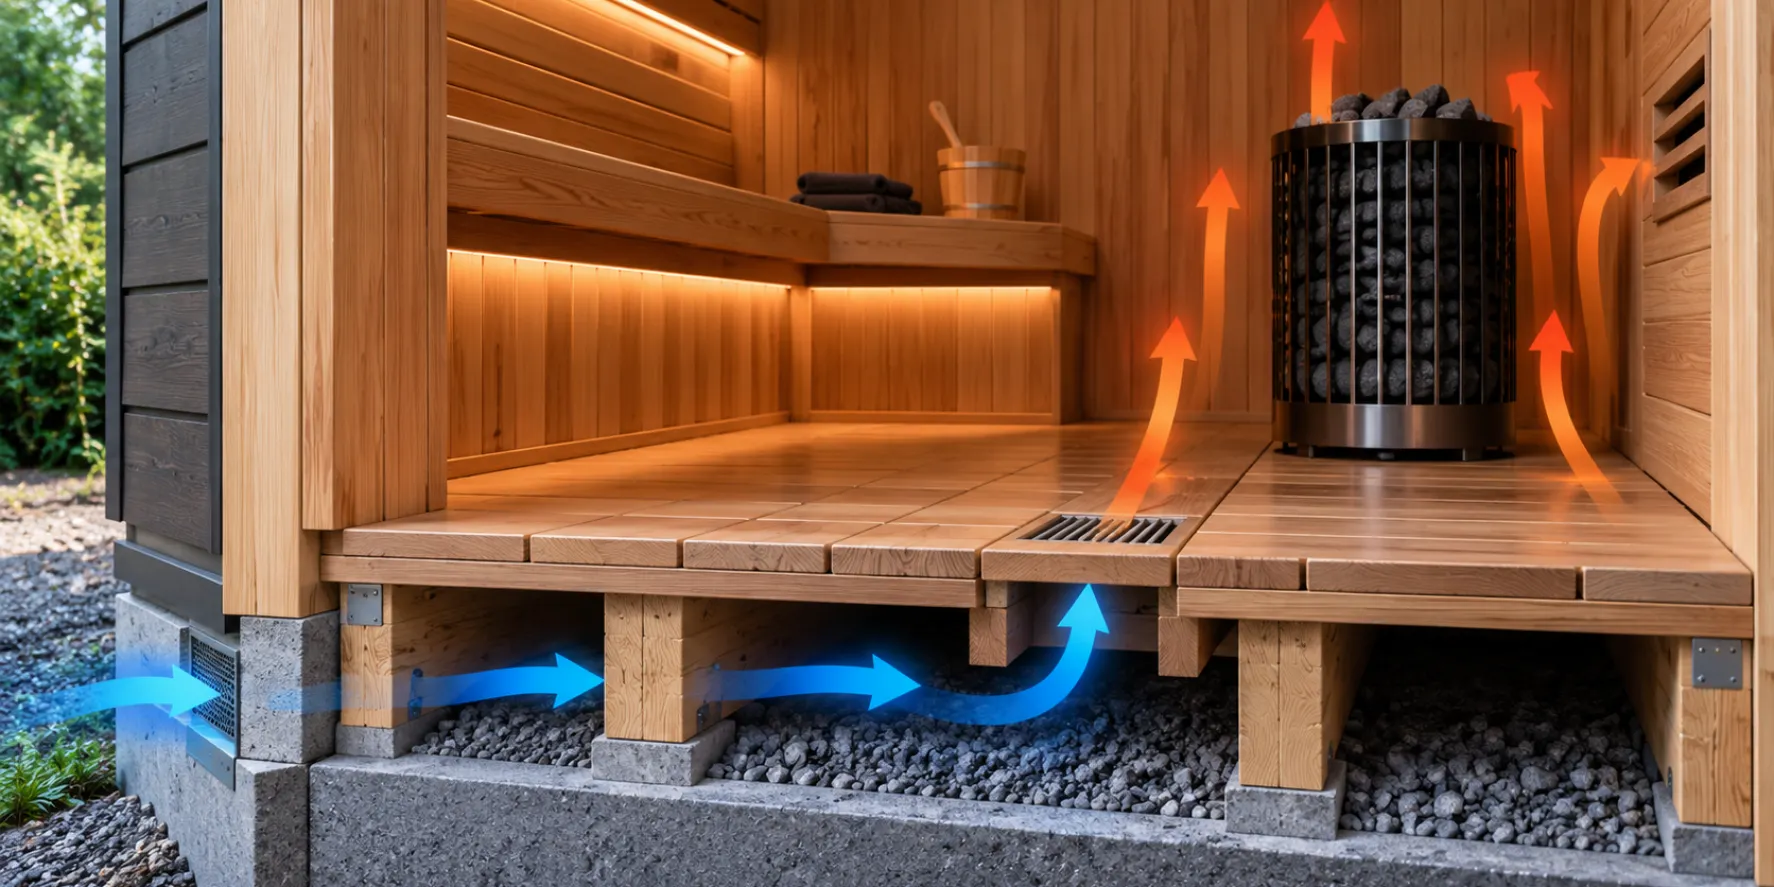
In some traditional sauna designs, the floor does more than provide a surface to walk on. Openings or gaps in the floor can form part of the ventilation strategy, allowing air to enter or leave the sauna through the structure below. This is a construction-specific approach rather than a feature that should be added to every sauna floor.
Floor-level airflow can matter to the overall sauna experience because ventilation affects how heat, humidity, and fresh air move through the room. When water is thrown on hot sauna stones to create löyly, the resulting heat and steam are experienced in the occupied zone above the benches, while cooler air remains lower in the room. The ventilation system has to support that environment without creating uncontrolled drafts or moisture problems in the floor structure.
When the Floor Is Part of the Ventilation Design
A traditional wooden sauna can be built with deliberate openings between or alongside floor components, or with a removable board that provides access to a ventilation opening. In the right design, the space below a raised floor can also participate in the airflow path. These details need to be planned together with the wall vents, heater location, drainage, and the way the sauna is expected to dry after use.
The important distinction is between an intentional ventilation opening and an uncontrolled gap in the construction. A purpose-designed opening has a known role in the airflow system; random gaps can instead allow drafts, moisture, insects, or exterior air to enter where they were never intended.
Do Not Add Floor Vents Without a Ventilation Plan
Floor ventilation should not be copied from another sauna simply because the detail works there. Prefabricated cabins, mechanically ventilated indoor saunas, traditional gravity-ventilated rooms, and raised outdoor saunas can all manage airflow differently.
If the sauna design uses the floor as part of its airflow path, the opening size and location should come from the sauna design, manufacturer, or ventilation plan. Otherwise, the floor should be built according to the specified structural, moisture, drainage, and installation requirements rather than modified to create additional airflow.
Indoor Sauna Flooring Requirements
Indoor sauna flooring has to work with the room that already surrounds the sauna. A cabin installed in a finished basement, bathroom, home gym, or garage can encounter very different floor conditions even when the sauna itself is similar.
Start by checking whether the existing floor is level, structurally suitable, reasonably easy to clean, and compatible with the sauna manufacturer’s installation instructions. Then consider how much water the sauna will introduce and what would happen if moisture reached the floor around or beneath the unit.
Basement Sauna Floors
Basements often provide a concrete slab, which can be a practical base for a sauna when it is sound, level enough for the installation, and free from unresolved moisture problems. Tile or another appropriate finish may be added where the project calls for it, while removable wooden walking surfaces can improve barefoot comfort inside a custom sauna.
Existing basement moisture should be addressed before the sauna is installed. A sauna floor assembly should not be expected to correct water intrusion, persistent dampness, or other building-envelope problems already affecting the slab or surrounding room.
Bathroom and Wet-Room Installations
A sauna integrated into a bathroom or dedicated wet room can benefit from an existing floor system designed to manage water, but the sauna still has to be coordinated with that construction. Waterproofing transitions, floor penetrations, thresholds, drains, and the sauna base all need to remain compatible rather than being treated as separate projects.
A tiled bathroom floor may therefore be an excellent starting point, but the presence of tile alone does not confirm that every part of the assembly is suitable for the sauna. The waterproofing system, heater requirements, floor geometry, and sauna manufacturer’s instructions still control the final installation.
Home Gym and Wellness Room Floors
Home gyms and wellness rooms frequently use rubber, vinyl, engineered flooring, or other resilient finishes that were selected for exercise equipment rather than sauna conditions. Before placing a sauna directly on one of these surfaces, confirm that the flooring manufacturer permits the expected temperature and loading conditions and that the sauna manufacturer allows the product beneath the cabin.
Thick rubber mats, foam tiles, and other compressible surfaces can also create an unstable base for a sauna that is intended to sit on a firm, level floor. Where necessary, the sauna may need a separate manufacturer-approved base rather than simply being placed over the room’s existing gym flooring. The available footprint should also account for the sauna itself and any installation or access space required around it, as explained in our sauna sizes and dimensions guide.
Garage Sauna Floors
A concrete garage floor can appear ideal for a sauna, but garages introduce their own installation questions. The slab may slope for vehicle or water drainage, the space may experience larger temperature swings than the rest of the house, and the floor can be exposed to moisture, road salts, oils, or other contaminants.
If the sauna requires a level base, an existing garage slope may need to be addressed as part of the installation rather than ignored. The surrounding environment also matters: the sauna should be located where the floor can remain clean and dry enough for the intended use and where the complete installation complies with the manufacturer’s requirements.
Outdoor Sauna Flooring Requirements
An outdoor sauna floor has to do more than provide a comfortable interior surface. It also forms part of a small building exposed to ground moisture, rain, snow, seasonal temperature changes, and the conditions beneath the structure. For that reason, the floor should be planned together with the sauna foundation and site drainage rather than treated as an interior finish alone.
The correct approach depends heavily on whether the sauna sits on a concrete slab or uses a raised framed floor supported by piers, footings, skids, or another approved foundation system.
Concrete Slab Foundations
A concrete slab can provide a durable, stable base for an outdoor sauna when it is properly designed for the structure and local site conditions. The finished interior may use the slab itself, an appropriate coating or finish, tile, or removable wooden walking surfaces depending on the sauna design.
The slab does not eliminate the need to manage exterior water. The surrounding grade should not direct rain or snowmelt toward the sauna, and water should not be allowed to collect against the building simply because the floor itself is concrete. In cold climates, the foundation design also needs to account for local frost and soil conditions.
Raised and Framed Sauna Floors
Many outdoor sauna cabins use a framed wooden floor raised above the ground. In this type of construction, the floor structure, supports, and foundation have to remain stable while allowing the underside of the sauna to avoid persistent contact with wet soil or trapped moisture.
The ground beneath and around the sauna should be managed so water can drain away rather than remain beneath the structure. Depending on the project, that may involve a prepared aggregate base, grading, drainage measures, or another site-specific foundation detail. The exact support system should follow the sauna manufacturer’s requirements and applicable local construction rules.
Ground Moisture and Drying
Moisture can reach an outdoor sauna floor from both directions. Water and humidity may come from sauna use above, while damp soil, rain, snow, and exterior humidity can affect the structure from below. A floor that dries adequately on the interior but remains persistently damp underneath can still develop long-term problems.
Raised structures therefore need enough separation and appropriate detailing to avoid trapping moisture beneath the floor. At the same time, openings beneath the sauna should not be improvised as ventilation for the sauna room itself unless they are intentionally part of the building’s ventilation design.
Freeze-Thaw and Seasonal Conditions
In climates with freezing winters, exterior sauna flooring and foundations also have to tolerate repeated seasonal changes. Water that collects in unsuitable materials, around the foundation, or in poorly drained areas can freeze and expand, while frost movement in the ground can affect an inadequately designed base.
This is why an outdoor sauna should be evaluated as both a hot room and an exterior structure. The visible floor inside the sauna is only the top of a system that includes the structural floor, foundation or supports, ground conditions, and exterior water management.
Can You Put a Sauna on an Existing Floor?
In many home sauna installations, yes. A prefabricated sauna can often be placed on an existing finished floor when that surface is stable, level, suitable for the sauna’s weight and expected conditions, and approved by the sauna manufacturer. The important point is that different flooring materials respond differently to heat, moisture, loading, and cleaning.
As part of the checks to make before buying a home sauna, confirm both sides of the equation: what the sauna manufacturer requires beneath the unit and what the flooring manufacturer allows on top of the existing floor. A surface being suitable for normal residential use does not automatically mean it is suitable beneath a sauna.
1. Tile
Tile is one of the most practical existing surfaces for many indoor sauna installations. A sound tile floor is durable, easy to clean, and generally tolerant of occasional moisture. It can work especially well beneath a prefabricated cabin when the floor is sufficiently level and the sauna manufacturer approves the installation.
Check for loose or cracked tiles, significant unevenness, and unresolved moisture problems before installation. Also remember that the visible tile surface does not reveal whether the construction beneath it is waterproof, which becomes more important in saunas expected to use substantial amounts of water.
2. Concrete
Concrete is another strong starting point because it provides a firm, durable base and is common in basements, garages, and slab-on-grade rooms. A sound concrete floor may be used directly beneath some saunas or finished with an appropriate surface where the project requires it.
The main checks are moisture condition, surface quality, and level. Garage and utility slabs may have an intentional slope, while older basement slabs can have cracks, low spots, or dampness that should be evaluated before the sauna is assembled.
3. Hardwood
Hardwood requires more caution because the existing floor is part of the finished house and can react to changes in moisture and temperature. A relatively dry prefabricated sauna may be permitted over certain wood floors, but that should be confirmed rather than assumed.
Consider the sauna’s expected water use, the possibility of moisture becoming trapped beneath the cabin, the stability of the floor, and the requirements of both manufacturers. A custom wet sauna should not rely on ordinary residential hardwood as its water-management system.
4. Laminate
Laminate flooring should be evaluated carefully because products differ in their resistance to heat and moisture, and water can be particularly problematic at joints, edges, and transitions. Floating floor systems can also have movement and loading considerations that are different from tile or concrete.
Do not assume that a moisture-resistant or water-resistant laminate is automatically approved beneath a sauna. The flooring specifications and sauna installation instructions should both permit the application.
5. LVP and Vinyl
Luxury vinyl plank and other vinyl floors can provide an easy-to-clean surface, but suitability beneath a sauna depends on the specific product. Temperature limits, adhesives, dimensional stability, emissions characteristics, and installation methods vary substantially between products.
If a sauna is being installed over LVP or vinyl, confirm the flooring manufacturer’s temperature and loading limitations as well as the sauna manufacturer’s approved floor surfaces. Marketing terms such as “waterproof” do not answer those questions by themselves.
6. Carpet
Carpet is generally a poor direct surface beneath a sauna because it is difficult to clean around moisture, can retain dirt and dampness, and may not provide the firm, stable base required by the sauna. Thick carpet and underlay can also allow movement beneath a cabin that is intended to sit on a solid level surface.
If the room is carpeted, check the sauna manufacturer’s instructions before installation rather than placing the unit directly over the carpet by default. In many projects, creating a suitable hard-surface area for the sauna is the more practical approach.
Flooring Around the Sauna Heater
The floor around a sauna heater deserves separate attention because the requirements in this area are determined by more than the flooring material alone. Heater type, mounting method, heat output, required safety clearances, and any specified floor protection all affect what can be installed beneath and immediately around the heater.
There is no single clearance distance or protective floor detail that applies to every sauna heater. The installation manual for the specific heater should determine the required separation from combustible materials and whether additional protection is needed.
Floor Protection Depends on the Heater
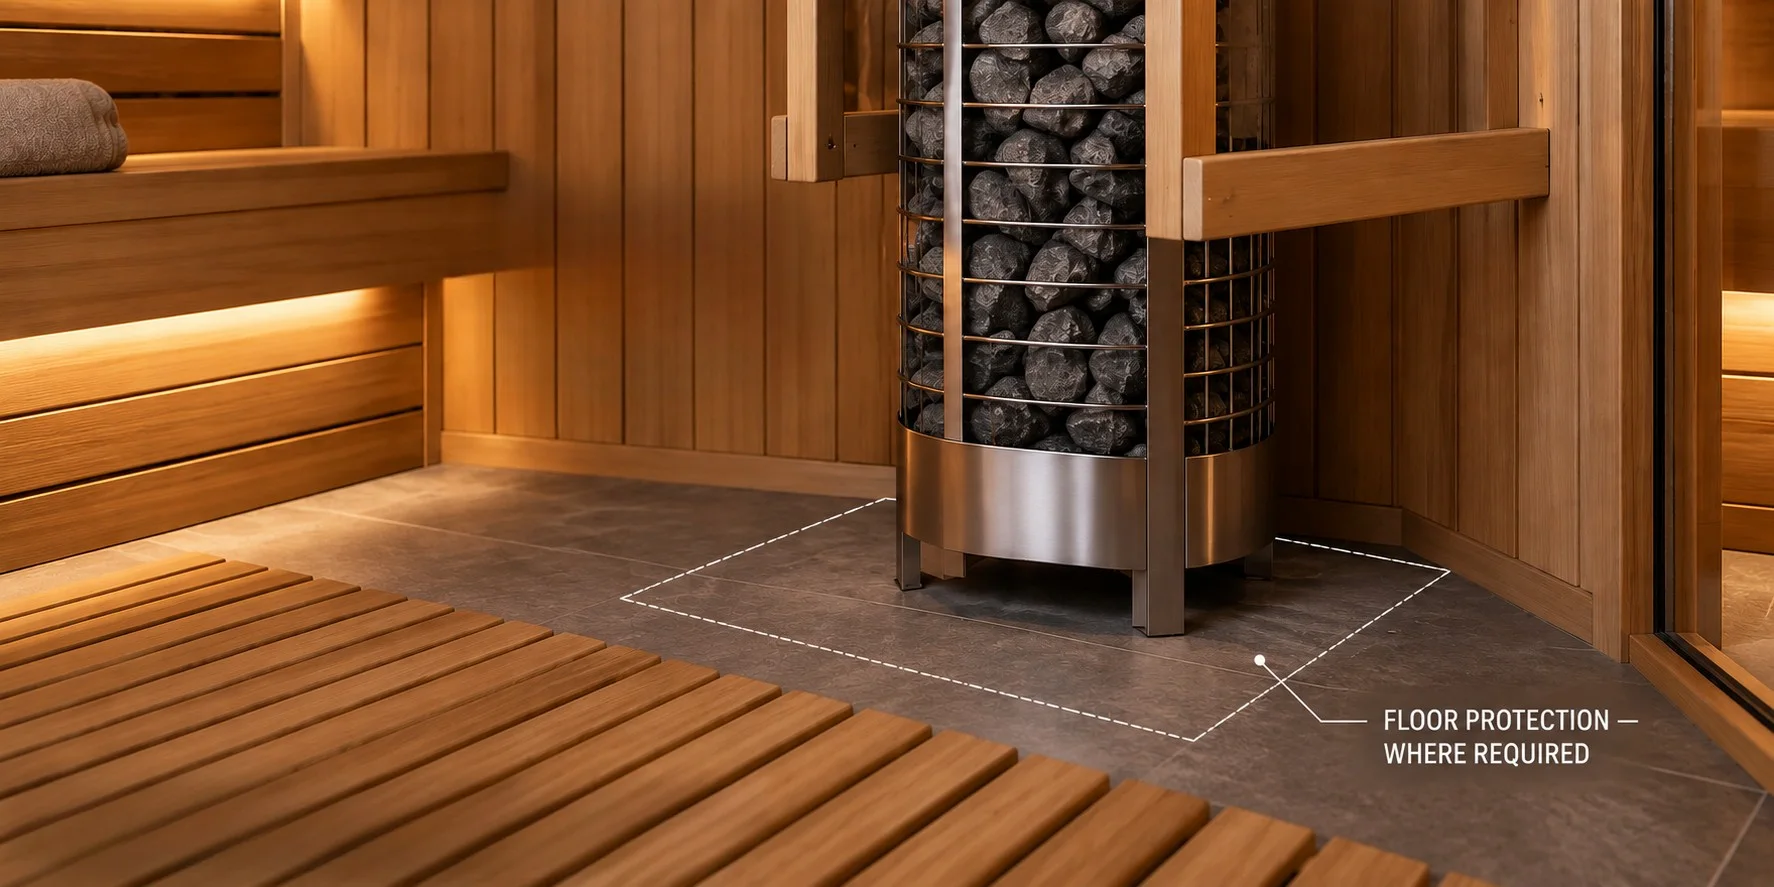
A wall-mounted electric heater, a floor-standing electric heater, and a wood-burning sauna stove can have very different installation requirements. Some electric heaters are designed to operate over an approved sauna floor without a separate protective pad, while other heater or stove installations may require noncombustible protection, specific mounting details, or additional separation from nearby combustible materials.
This is particularly important where the sauna uses wood duckboards or another removable wooden walking surface. A comfortable wood surface elsewhere in the room should not automatically be extended into the heater area if doing so conflicts with the heater manufacturer’s specified clearances or floor-protection requirements.
Do Not Guess Heater Clearances
Generic diagrams can be useful for understanding the idea of a safety zone, but they should not be used to determine the actual dimensions around a heater. Clearances can vary by model, heater output, guard design, mounting configuration, and the materials surrounding the unit.
Confirm the heater manual before finalizing the floor finish, heater guard, nearby wood surfaces, or penetrations through the floor. For electric installations, the flooring decision should also be coordinated with the power supply, wiring route, and other requirements covered in our home sauna electrical requirements guide . Planning these details before the finished floor is complete helps avoid having to modify the flooring later to accommodate the heater installation.
Sauna Flooring Mistakes to Avoid
Most sauna flooring problems do not come from choosing one universally “wrong” material. They come from applying the right material in the wrong installation, overlooking the construction beneath it, or following a general rule that does not match the sauna being installed.
1. Choosing Flooring Based on Appearance Alone
A floor can look perfect beside cedar or thermowood and still be a poor fit for the installation. Heat exposure, moisture, barefoot traction, cleaning, structural stability, and compatibility with the sauna all matter. Start with those requirements, then choose the finish you prefer from the suitable options.
2. Assuming Every Sauna Needs a Floor Drain
A drain can be useful in a purpose-built traditional sauna or another installation where water is expected on the floor, but it is not a universal requirement. Some prefabricated saunas are designed for installation on a flat finished surface and may not call for a floor drain at all.
3. Assuming a Sauna Never Needs a Drain
The opposite assumption can create just as many problems. If the sauna will use substantial water, be washed frequently, or form part of a wet-area construction, drainage may need to be incorporated into the floor assembly. That decision should be made before the finished floor is installed.
4. Treating Tile as the Waterproofing System
Tile is a durable finished surface, but the visible tile layer should not automatically be treated as proof that the entire floor assembly is waterproof. Where waterproofing is required, the substrate, waterproofing system, penetrations, transitions, and any drainage details need to work together beneath the finished surface.
5. Ignoring the Floor Around the Heater
The heater area should not be planned by extending the same flooring treatment across the entire sauna without checking the heater instructions. Required clearances and any floor-protection measures depend on the specific heater, its mounting configuration, and the surrounding materials.
6. Using Flooring Without Checking Its Limits
Materials such as vinyl, LVP, laminate, rubber, adhesives, coatings, and underlayments can have product-specific temperature, moisture, loading, and installation limitations. Terms such as “waterproof” or “water-resistant” do not confirm that a product is suitable beneath or inside a sauna.
7. Ignoring Drying and Ventilation
A sauna floor should not only tolerate moisture during use; the room also needs a practical way to dry afterward. Persistent dampness can affect wood surfaces, joints, the floor assembly, and surrounding construction. Our sauna ventilation requirements guide explains how intake, exhaust, airflow, and post-session drying should be planned as part of the complete sauna.
8. Following a Generic Diagram Instead of the Installation Manual
Generic diagrams are useful for understanding concepts such as drainage, waterproofing, floor ventilation, and heater protection. They are not substitutes for the documentation supplied with the actual sauna, heater, flooring system, or waterproofing product.
Before construction is finalized, compare the proposed floor with the current manufacturer instructions and the requirements that apply to the project. The safest flooring plan is the one designed around the sauna you are actually installing, not a detail copied from a different sauna.
How to Choose the Right Sauna Floor
The easiest way to choose a sauna floor is to start with the installation rather than the finish. Identify whether the sauna is prefabricated or custom built, indoor or outdoor, relatively dry or regularly exposed to water, and then match the floor to the requirements of that specific project.
The table below summarizes the most practical starting point for the main types of home sauna installations. It is a planning guide rather than a substitute for the sauna, heater, flooring, waterproofing, or foundation instructions that apply to the actual project.
| Installation | Best Starting Point | Drainage / Waterproofing | Main Check |
|---|---|---|---|
| Prefab infrared sauna | Manufacturer-approved existing hard floor or specified base | Usually installation-specific; a dedicated drain is commonly not part of the cabin itself | Floor compatibility, stability, level base, and manufacturer approval |
| Prefab traditional sauna | Tile, concrete, or another manufacturer-approved finished surface | Follow the sauna manufacturer’s requirements and expected water use | Water exposure, heater requirements, and suitability of the existing floor |
| Custom traditional sauna | Tile, sealed concrete, or another purpose-designed sauna floor assembly | Assess as part of the complete floor and water-management system | Waterproofing, drainage strategy, floor geometry, and heater area |
| Indoor wet-area sauna | Durable finish integrated with a properly designed wet-area floor assembly | Often more important because the sauna is part of a water-managed room | Waterproofing transitions, penetrations, thresholds, and drain coordination |
| Outdoor sauna on slab | Concrete, suitable tile, or an appropriate removable walking surface over the slab | Coordinate interior water management with exterior grading and site drainage | Slab condition, foundation design, climate, and water around the structure |
| Outdoor sauna on framed floor | Purpose-designed framed floor assembly with a sauna-appropriate interior surface | Construction-specific and dependent on the sauna design and expected water exposure | Foundation, structural support, ground moisture, underside drying, and manufacturer requirements |
There is no single best sauna floor for every installation. The right choice is the floor assembly that matches the sauna type, expected water exposure, heater requirements, underlying structure, and manufacturer instructions.
If those conditions are established first, choosing between tile, concrete, wood, stone, or an approved existing floor becomes much simpler. The flooring material is then selected to fit the installation rather than forcing the installation to work around the flooring.
Final Thoughts on Sauna Flooring
Choosing a sauna floor becomes much easier once the installation is defined. Tile and concrete are practical starting points for many projects because they can provide a durable, cleanable surface, while removable wood duckboards can improve barefoot comfort where the sauna design allows them. But none of these options is automatically right for every sauna.
A prefabricated indoor cabin, a custom traditional sauna, and an outdoor sauna can place very different demands on the floor beneath them. The same is true of drainage, slope, and waterproofing. These features should be included when the installation requires them rather than treated as universal rules that apply to every home sauna.
Before committing to a floor, confirm the expected water exposure, the condition and structure beneath the sauna, how the space will drain and dry, and any requirements around the heater. Manufacturer instructions for the sauna, heater, flooring, waterproofing system, and other installed components should take priority over generic diagrams or rules of thumb.
The best sauna floor is not simply the material that handles heat or moisture best. It is the complete floor assembly that works with the sauna, the heater, the expected water exposure, the structure beneath it, and the way the space will be used and maintained.
Sauna Flooring Questions
What is the best flooring for a home sauna?
Tile and concrete are practical starting points for many home saunas because they are durable and easy to clean. Removable wooden duckboards can improve barefoot comfort over an appropriate base. The best choice still depends on the sauna type, expected water exposure, heater requirements, and manufacturer instructions.
Can you put a sauna on a tile floor?
Often, yes. A sound, level tile floor can work well beneath many prefabricated indoor saunas when the sauna manufacturer approves the installation. Tile is also common in custom sauna floor assemblies, but the tile surface alone does not confirm that the construction beneath it is waterproof.
Can you put a sauna on concrete?
Concrete can provide a stable and durable base for both indoor and outdoor saunas. Before installation, check the slab for moisture problems, cracks, significant unevenness, or an intentional slope that conflicts with the sauna’s requirement for a level base.
Can a sauna have a wood floor?
Yes, when the wood floor is designed for the sauna and can be cleaned and dried properly. Removable slatted duckboards are commonly used as a comfortable walking surface over tile, concrete, or another suitable base. Ordinary residential hardwood should not automatically be treated as the water-management layer of a wet sauna.
Can you install a sauna over vinyl or LVP flooring?
Only when both the sauna manufacturer and the flooring manufacturer permit the application. Vinyl and LVP products vary in temperature limits, adhesives, dimensional stability, loading requirements, and installation restrictions, so a product being marketed as waterproof is not enough by itself.
Does a sauna floor need to be waterproof?
Not every sauna needs the same waterproof floor assembly. A relatively dry prefabricated cabin may only require a suitable finished floor, while a custom traditional sauna or wet-area installation may need a purpose-designed waterproofing system beneath the finished surface.
Does a home sauna need a floor drain?
Not always. A drain can be useful where substantial water reaches the floor or the room is washed regularly, but some prefabricated saunas are designed for installation on a level finished floor without a dedicated drain. The sauna manufacturer’s instructions and the intended water use should guide the decision.
Should a sauna floor be sloped toward a drain?
Only when the drainage design calls for it. A purpose-built sauna with a floor drain may use a sloped floor to direct water toward the outlet, while many prefabricated cabins require a flat, level base. There is no universal sauna floor slope that applies to every installation.
What should go under an outdoor sauna?
The base depends on the sauna design and site conditions. Outdoor saunas may use a concrete slab, framed floor, piers, footings, skids, or another manufacturer-approved foundation system. Structural support, ground moisture, exterior drainage, soil conditions, and freeze-thaw exposure should all be considered.
Can you put a sauna directly on carpet?
Carpet is generally a poor direct surface beneath a sauna because it can retain dirt and moisture and may not provide the firm, stable base required by the unit. Check the sauna manufacturer’s instructions; in many rooms, creating a suitable hard-surface area beneath the sauna is the more practical option.
Sources & methodology
Verdict Lux evaluates sauna flooring as a complete installation system rather than only as a visible finish. We reviewed current sauna construction guides and installation manuals together with wet-area tile guidance and peer-reviewed slip-resistance research, focusing on expected water exposure, drainage, waterproofing, floor support, barefoot traction, removable duckboards, outdoor foundations, heater-area protection, cleaning and post-use drying. We did not physically install or laboratory-test the flooring materials discussed in this guide.
Manufacturer requirements are treated as installation-specific rather than universal rules. Tylö, Finnleo and Finlandia publish different floor and drain guidance for different sauna constructions, while SaunaLife documents separate foundation requirements for an outdoor cabin. We therefore compare floor materials by the conditions they must handle—water exposure, cleaning, drying, support, wet-foot traction and heater compatibility and use independent wet-area guidance and published research where those questions extend beyond sauna-manufacturer documentation.
Verify the current instructions for the exact sauna, heater, flooring product, waterproofing system and foundation before construction begins. Confirm expected water exposure, whether a drain or slope is actually required, the approved supporting surface, wet-foot traction, heater-area protection, outdoor site drainage and any local wet-area or building requirements. Where tile is used, the visible tile surface should not be treated as proof that the complete assembly beneath it is waterproof.